4. Quick Starter
Section author: jryannel@LinkedIn
Note
Last Build: December 07, 2020 at 10:50 CET
The source code for this chapter can be found in the assets folder.
This chapter provides an overview of QML, the declarative user interface language used in Qt 5. We will discuss the QML syntax, which is a tree of elements, followed by an overview of the most important basic elements. Later we will briefly look at how to create our own elements, called components and how to transform elements using property manipulations. Towards the end, we will look at how to arrange elements together in a layout and finally have a look at elements where the user can provide input.
4.1. QML Syntax
QML is a declarative language used to describe the user interface of your application. It breaks down the user interface into smaller elements, which can be combined into components. QML describes the look and the behavior of these user interface elements. This user interface description can be enriched with JavaScript code to provide simple but also more complex logic. In this perspective, it follows the HTML-JavaScript pattern but QML is designed from the ground up to describe user interfaces, not text-documents.
In its simplest way, QML is a hierarchy of elements. Child elements inherit the coordinate system from the parent. An x,y coordinate is always relative to the parent.
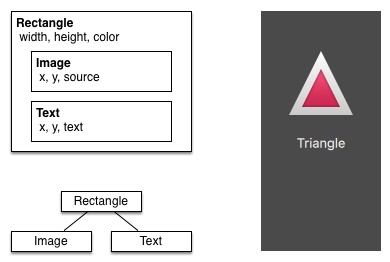
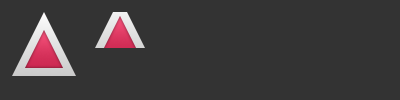
Let’s start with a simple example of a QML file to explain the different syntax.
// RectangleExample.qml

import QtQuick 2.5

// The root element is the Rectangle
Rectangle {
    // name this element root
    id: root

    // properties: <name>: <value>
    width: 120; height: 240

    // color property
    color: "#4A4A4A"

    // Declare a nested element (child of root)
    Image {
        id: triangle

        // reference the parent
        x: (parent.width - width)/2; y: 40

        source: 'assets/triangle_red.png'
    }

    // Another child of root
    Text {
        // un-named element

        // reference element by id
        y: triangle.y + triangle.height + 20

        // reference root element
        width: root.width

        color: 'white'
        horizontalAlignment: Text.AlignHCenter
        text: 'Triangle'
    }
}
- The
importstatement imports a module in a specific version. - Comments can be made using
//for single line comments or/* */for multi-line comments. Just like in C/C++ and JavaScript - Every QML file needs to have exactly one root element, like HTML
- An element is declared by its type followed by
{ } - Elements can have properties, they are in the form `` name: value``
- Arbitrary elements inside a QML document can be accessed by using their
id(an unquoted identifier) - Elements can be nested, meaning a parent element can have child elements. The parent element can be accessed using the
parentkeyword
The import statement you import a specific version of a module. For the QML modules that comes with Qt the version is linked to the Qt version you intend to use. The lower the version number, the earlier Qt version can be used. The minor version of the import statement matches the minor version of the Qt release, so Qt 5.11 corresponds to QtQuick 2.11, Qt 5.12 to QtQuick 2.12 and so on. Prior to Qt 5.11, the QML modules shipped with Qt had their own versioning sequences, meaning that QtQuick followed the Qt versions, while QtQuick.Controls started with version 2.0 at Qt 5.7 and was at version 2.4 by Qt 5.11.
Tip
Often you want to access a particular element by id or a parent element using the parent keyword. So it’s good practice to name your root element “root” using id: root. Then you don’t have to think about how the root element is named in your QML document.
Hint
You can run the example using the Qt Quick runtime from the command line from your OS like this:
$ $QTDIR/bin/qmlscene RectangleExample.qml
Where you need to replace the $QTDIR to the path to your Qt installation. The qmlscene executable initializes the Qt Quick runtime and interprets the provided QML file.
In Qt Creator, you can open the corresponding project file and run the document RectangleExample.qml.
4.1.1. Properties
Elements are declared by using their element name but are defined by using their properties or by creating custom properties. A property is a simple key-value pair, e.g. width : 100, text: 'Greetings', color: '#FF0000'. A property has a well-defined type and can have an initial value.
    Text {
        // (1) identifier
        id: thisLabel

        // (2) set x- and y-position
        x: 24; y: 16

        // (3) bind height to 2 * width
        height: 2 * width

        // (4) custom property
        property int times: 24

        // (5) property alias
        property alias anotherTimes: thisLabel.times

        // (6) set text appended by value
        text: "Greetings " + times

        // (7) font is a grouped property
        font.family: "Ubuntu"
        font.pixelSize: 24

        // (8) KeyNavigation is an attached property
        KeyNavigation.tab: otherLabel

        // (9) signal handler for property changes
        onHeightChanged: console.log('height:', height)

        // focus is need to receive key events
        focus: true

        // change color based on focus value
        color: focus?"red":"black"
    }
Let’s go through the different features of properties:
idis a very special property-like value, it is used to reference elements inside a QML file (called “document” in QML). Theidis not a string type but rather an identifier and part of the QML syntax. Anidneeds to be unique inside a document and it can’t be reset to a different value, nor may it be queried. (It behaves much like a reference in the C++ world.)A property can be set to a value, depending on its type. If no value is given for a property, an initial value will be chosen. You need to consult the documentation of the particular element for more information about the initial value of a property.
A property can depend on one or many other properties. This is called binding. A bound property is updated when its dependent properties change. It works like a contract, in this case, the
heightshould always be two times thewidth.Adding own properties to an element is done using the
propertyqualifier followed by the type, the name and the optional initial value (property <type> <name> : <value>). If no initial value is given a system initial value is chosen.Note
You can also declare one property to be the default property if no property name is given by prepending the property declaration with the
defaultkeyword. This is used for example when you add child elements, the child elements are added automatically to the default propertychildrenof type list if they are visible elements.Another important way of declaring properties is using the
aliaskeyword (property alias <name>: <reference>). Thealiaskeyword allows us to forward a property of an object or an object itself from within the type to an outer scope. We will use this technique later when defining components to export the inner properties or element ids to the root level. A property alias does not need a type, it uses the type of the referenced property or object.The
textproperty depends on the custom propertytimesof type int. Theintbased value is automatically converted to astringtype. The expression itself is another example of binding and results in the text being updated every time thetimesproperty changes.Some properties are grouped properties. This feature is used when a property is more structured and related properties should be grouped together. Another way of writing grouped properties is
font { family: "Ubuntu"; pixelSize: 24 }.Some properties are attached to the element itself. This is done for global relevant elements which appear only once in the application (e.g. keyboard input). The writing is
<Element>.<property>: <value>.For every property, you can provide a signal handler. This handler is called after the property changes. For example, here we want to be notified whenever the height changes and use the built-in console to log a message to the system.
Warning
An element id should only be used to reference elements inside your document (e.g. the current file). QML provides a mechanism called dynamic-scoping where later loaded documents overwrite the element id’s from earlier loaded documents. This makes it possible to reference element id’s from earlier loaded documents if they are not yet overwritten. It’s like creating global variables. Unfortunately, this frequently leads to really bad code in practice, where the program depends on the order of execution. Unfortunately, this can’t be turned off. Please only use this with care or even better don’t use this mechanism at all. It’s better to export the element you want to provide to the outside world using properties on the root element of your document.
4.1.2. Scripting
QML and JavaScript (also known as ECMAScript) are best friends. In the JavaScript chapter we will go into more detail on this symbiosis. Currently, we just want to make you aware of this relationship.
    Text {
        id: label

        x: 24; y: 24

        // custom counter property for space presses
        property int spacePresses: 0

        text: "Space pressed: " + spacePresses + " times"

        // (1) handler for text changes
        onTextChanged: console.log("text changed to:", text)

        // need focus to receive key events
        focus: true

        // (2) handler with some JS
        Keys.onSpacePressed: {
            increment()
        }

        // clear the text on escape
        Keys.onEscapePressed: {
            label.text = ''
        }

        // (3) a JS function
        function increment() {
            spacePresses = spacePresses + 1
        }
    }
- The text changed handler
onTextChangedprints the current text every-time the text changed due to a space-bar key pressed - When the text element receives the space-bar key (because the user pressed the space-bar on the keyboard) we call a JavaScript function
increment(). - Definition of a JavaScript function in the form of
function <name>(<parameters>) { ... }, which increments our counterspacePressed. Every timespacePressedis incremented, bound properties will also be updated.
Note
The difference between the QML : (binding) and the JavaScript = (assignment) is, that the binding is a contract and keeps true over the lifetime of the binding, whereas the JavaScript assignment (=) is a one time value assignment.
The lifetime of a binding ends, when a new binding is set to the property or even when a JavaScript value is assigned is to the property. For example, a key handler setting the text property to an empty string would destroy our increment display:
Keys.onEscapePressed: {
    label.text = ''
}
After pressing escape, pressing the space-bar will not update the display anymore as the previous binding of the text property (text: “Space pressed: ” + spacePresses + ” times”) was destroyed.
When you have conflicting strategies to change a property as in this case (text updated by a change to a property increment via a binding and text cleared by a JavaScript assignment) then you can’t use bindings! You need to use assignment on both property change paths as the binding will be destroyed by the assignment (broken contract!).
4.2. Basic Elements
Elements can be grouped into visual and non-visual elements. A visual element (like the Rectangle) has a geometry and normally presents an area on the screen. A non-visual element (like a Timer) provides general functionality, normally used to manipulate the visual elements.
Currently, we will focus on the fundamental visual elements, such as Item, Rectangle, Text, Image and MouseArea. However, by using the Qt Quick Controls 2 module, it is possible to create user interfaces built from standard platform components such as buttons, labels and sliders.
4.2.1. Item Element
Item is the base element for all visual elements as such all other visual elements inherits from Item. It doesn’t paint anything by itself but defines all properties which are common across all visual elements:
| Group | Properties |
|---|---|
| Geometry | x and y to define the top-left position, width and height for the expansion of the element and also the z stacking order to lift elements up or down from their natural ordering |
| Layout handling | anchors (left, right, top, bottom, vertical and horizontal center) to position elements relative to other elements with their margins |
| Key handling | attached Key and KeyNavigation properties to control key handling and the input focus property to enable key handling in the first place |
| Transformation | scale and rotate transformation and the generic transform property list for x,y,z transformation and their transformOrigin point |
| Visual | opacity to control transparency, visible to show/hide elements, clip to restrain paint operations to the element boundary and smooth to enhance the rendering quality |
| State definition | states list property with the supported list of states and the current state property as also the transitions list property to animate state changes. |
To better understand the different properties we will try to introduce them throughout this chapter in the context of the element presented. Please remember these fundamental properties are available on every visual element and work the same across these elements.
Note
The Item element is often used as a container for other elements, similar to the div element in HTML.
4.2.2. Rectangle Element
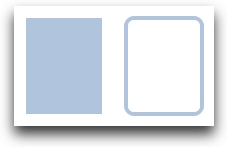
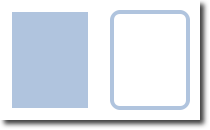
The Rectangle extends Item and adds a fill color to it. Additionally it supports borders defined by border.color and border.width. To create rounded rectangles you can use the radius property.
    Rectangle {
        id: rect1
        x: 12; y: 12
        width: 76; height: 96
        color: "lightsteelblue"
    }
    Rectangle {
        id: rect2
        x: 112; y: 12
        width: 76; height: 96
        border.color: "lightsteelblue"
        border.width: 4
        radius: 8
    }
Note
Valid colors values are colors from the SVG color names (see http://www.w3.org/TR/css3-color/#svg-color). You can provide colors in QML in different ways, but the most common way is an RGB string (‘#FF4444’) or as a color name (e.g. ‘white’).
Besides a fill color and a border the rectangle also supports custom gradients.
    Rectangle {
        id: rect1
        x: 12; y: 12
        width: 176; height: 96
        gradient: Gradient {
            GradientStop { position: 0.0; color: "lightsteelblue" }
            GradientStop { position: 1.0; color: "slategray" }
        }
        border.color: "slategray"
    }
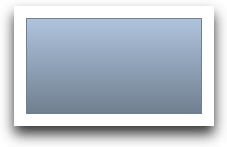
A gradient is defined by a series of gradient stops. Each stop has a position and a color. The position marks the position on the y-axis (0 = top, 1 = bottom). The color of the GradientStop marks the color at that position.
Note
A rectangle with no width/height set will not be visible. This happens often when you have several rectangles width (height) depending on each other and something went wrong in your composition logic. So watch out!
Note
It is not possible to create an angled gradient. For this, it’s better to use predefined images. One possibility would be to just rotate the rectangle with the gradient, but be aware the geometry of a rotated rectangle will not change and thus will lead to confusion as the geometry of the element is not the same as the visible area. From the authors perspective, it’s really better to use designed gradient images in that case.
4.2.3. Text Element
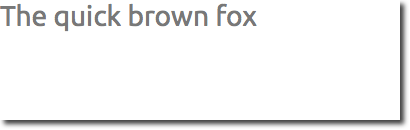
To display text, you can use the Text element. Its most notable property is the text property of type string. The element calculates its initial width and height based on the given text and the font used. The font can be influenced using the font property group (e.g. font.family, font.pixelSize, …). To change the color of the text just use the color property.
    Text {
        text: "The quick brown fox"
        color: "#303030"
        font.family: "Ubuntu"
        font.pixelSize: 28
    }
Text can be aligned to each side and the center using the horizontalAlignment and verticalAlignment properties. To further enhance the text rendering you can use the style and styleColor property, which allows you render the text in outline, raised and sunken mode. For longer text, you often want to define a break position like A very … long text, this can be achieved using the elide property. The elide property allows you to set the elide position to the left, right or middle of your text. In case you don’t want the ‘…’ of the elide mode to appear but still want to see the full text you can also wrap the text using the wrapMode property (works only when the width is explicitly set):
Text {
    width: 40; height: 120
    text: 'A very long text'
    // '...' shall appear in the middle
    elide: Text.ElideMiddle
    // red sunken text styling
    style: Text.Sunken
    styleColor: '#FF4444'
    // align text to the top
    verticalAlignment: Text.AlignTop
    // only sensible when no elide mode
    // wrapMode: Text.WordWrap
}
A Text element only displays the given text. It does not render any background decoration. Besides the rendered text the Text element is transparent. It’s part of your overall design to provide a sensible background to the text element.
Note
Be aware a Text initial width (height) is depending on the text string and on the font set. A Text element with no width set and no text will not be visible, as the initial width will be 0.
Note
Often when you want to layout Text elements you need to differentiate between aligning the text inside the Text element boundary box or to align the element boundary box itself. In the former, you want to use the horizontalAlignment and verticalAlignment properties and in the latter case, you want to manipulate the element geometry or use anchors.
4.2.4. Image Element
An Image element is able to display images in various formats (e.g. PNG, JPG, GIF, BMP, WEBP). For the full list of supported image formats, please consult the Qt documentation. Besides the obvious source property to provide the image URL, it contains a fillMode which controls the resizing behavior.
    Image {
        x: 12; y: 12
        // width: 72
        // height: 72
        source: "assets/triangle_red.png"
    }
    Image {
        x: 12+64+12; y: 12
        // width: 72
        height: 72/2
        source: "assets/triangle_red.png"
        fillMode: Image.PreserveAspectCrop
        clip: true
    }
Note
A URL can be a local path with forward slashes ( “./images/home.png” ) or a web-link (e.g. “http://example.org/home.png”).
Note
Image elements using PreserveAspectCrop should also enable the clipping to avoid image data being rendered outside the Image boundaries. By default clipping is disabled (`` clip: false``). You need to enable clipping (`` clip: true``) to constrain the painting to the elements bounding rectangle. This can be used on any visual element.
Tip
Using C++ you are able to create your own image provider using QQuickImageProvider. This allows you to create images on the fly and threaded image loading.
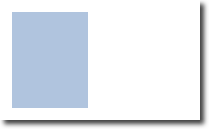
4.2.5. MouseArea Element
To interact with these elements you often will use a MouseArea. It’s a rectangular invisible item in where you can capture mouse events. The mouse area is often used together with a visible item to execute commands when the user interacts with the visual part.
    Rectangle {
        id: rect1
        x: 12; y: 12
        width: 76; height: 96
        color: "lightsteelblue"
        MouseArea {
            id: area
            width: parent.width
            height: parent.height
            onClicked: rect2.visible = !rect2.visible
        }
    }

    Rectangle {
        id: rect2
        x: 112; y: 12
        width: 76; height: 96
        border.color: "lightsteelblue"
        border.width: 4
        radius: 8
    }
|
|
Note
This is an important aspect of Qt Quick, the input handling is separated from the visual presentation. By this it allows you to show the user an interface element, but the interaction area can be larger.
Note
For more complex interaction, Qt Quick Input Handlers where introduced with Qt 5.12. They are intended to be used instead of elements such as MouseArea and Flickable and offer greater control and flexibility. The idea is to handle one interaction aspect in each handler instance instead of centralizing the handling of all events from a given source in a single element, which was the case before.
4.3. Components
A component is a reusable element and QML provides different ways to create components. Currently, we will look only at the simplest form - a file-based component. A file-based component is created by placing a QML element in a file and give the file an element name (e.g. Button.qml). You can use the component like every other element from the QtQuick module, in our case you would use this in your code as Button { ... }.
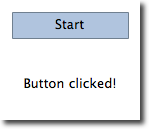
For example, let’s create a rectangle containing a text component and a mouse area. This resembles a simple button and doesn’t need to be more complicated for our purposes.
    Rectangle { // our inlined button ui
        id: button
        x: 12; y: 12
        width: 116; height: 26
        color: "lightsteelblue"
        border.color: "slategrey"
        Text {
            anchors.centerIn: parent
            text: "Start"
        }
        MouseArea {
            anchors.fill: parent
            onClicked: {
                status.text = "Button clicked!"
            }
        }
    }

    Text { // text changes when button was clicked
        id: status
        x: 12; y: 76
        width: 116; height: 26
        text: "waiting ..."
        horizontalAlignment: Text.AlignHCenter
    }
The UI will look similar to this. On the left the UI in the initial state, on the right after the button has been clicked.

|
|
Our task is now to extract the button UI in a reusable component. For this, we shortly think about a possible API for our button. You can do this by imagining how someone else should use your button. Here’s what I came up with:
// minimal API for a button
Button {
    text: "Click Me"
    onClicked: { /* do something */ }
}
I would like to set the text using a text property and to implement my own click handler. Also, I would expect the button to have a sensible initial size, which I can overwrite (e.g. with width: 240 for example).
To achieve this we create a Button.qml file and copy our button UI inside. Additionally, we need to export the properties a user might want to change on the root level.
// Button.qml

import QtQuick 2.5

Rectangle {
    id: root
    // export button properties
    property alias text: label.text
    signal clicked

    width: 116; height: 26
    color: "lightsteelblue"
    border.color: "slategrey"

    Text {
        id: label
        anchors.centerIn: parent
        text: "Start"
    }
    MouseArea {
        anchors.fill: parent
        onClicked: {
            root.clicked()
        }
    }
}
We have exported the text and clicked signal on the root level. Typically we name our root element root to make the referencing easier. We use the alias feature of QML, which is a way to export properties inside nested QML elements to the root level and make this available for the outside world. It is important to know, that only the root level properties can be accessed from outside this file by other components.
To use our new Button element we can simply declare it in our file. So the earlier example will become a little bit simplified.
    Button { // our Button component
        id: button
        x: 12; y: 12
        text: "Start"
        onClicked: {
            status.text = "Button clicked!"
        }
    }

    Text { // text changes when button was clicked
        id: status
        x: 12; y: 76
        width: 116; height: 26
        text: "waiting ..."
        horizontalAlignment: Text.AlignHCenter
    }
Now you can use as many buttons as you like in your UI by just using Button { ... }. A real button could be more complex, e.g providing feedback when clicked or showing a nicer decoration.
Note
If you want to, you could even go a step further and use an item as a root element. This prevents users to change the color of our designed button and provides us with more control about the exported API. The target should be to export a minimal API. Practically this means we would need to replace the root Rectangle with an Item and make the rectangle a nested element in the root item.
Item {
    id: root
    width: 116; height: 26

    property alias text: label.text
    signal clicked

    Rectangle {
        anchors.fill parent
        color: "lightsteelblue"
        border.color: "slategrey"
    }
    ...
}
With this technique, it is easy to create a whole series of reusable components.
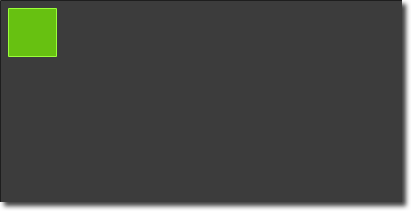
4.4. Simple Transformations
A transformation manipulates the geometry of an object. QML Items can, in general, be translated, rotated and scaled. There is a simple form of these operations and a more advanced way.
Let’s start with the simple transformations. Here is our scene as our starting point.
A simple translation is done via changing the x,y position. A rotation is done using the rotation property. The value is provided in degrees (0 .. 360). A scaling is done using the scale property and a value <1 means the element is scaled down and >1 means the element is scaled up. The rotation and scaling do not change your geometry. The items x,y and width/height haven’t changed. Just the painting instructions are transformed.
Before we show off the example I would like to introduce a little helper: The ClickableImage element. The ClickableImage is just an image with a mouse area. This brings up a useful rule of thumb - if you have copied a chunk of code three times, extract it into a component.
// ClickableImage.qml

// Simple image which can be clicked

import QtQuick 2.5

Image {
    id: root
    signal clicked

    MouseArea {
        anchors.fill: parent
        onClicked: root.clicked()
    }
}
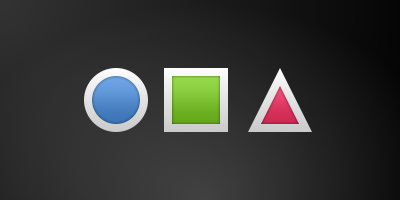
We use our clickable image to present three objects (box, circle, triangle). Each object performs a simple transformation when clicked. Clicking the background will reset the scene.
// transformation.qml


import QtQuick 2.5

Item {
    // set width based on given background
    width: bg.width
    height: bg.height

    Image { // nice background image
        id: bg
        source: "assets/background.png"
    }

    MouseArea {
        id: backgroundClicker
        // needs to be before the images as order matters
        // otherwise this mousearea would be before the other elements
        // and consume the mouse events
        anchors.fill: parent
        onClicked: {
            // reset our little scene
            circle.x = 84
            box.rotation = 0
            triangle.rotation = 0
            triangle.scale = 1.0
        }
    }

    ClickableImage {
        id: circle
        x: 84; y: 68
        source: "assets/circle_blue.png"
        antialiasing: true
        onClicked: {
            // increase the x-position on click
            x += 20
        }
    }

    ClickableImage {
        id: box
        x: 164; y: 68
        source: "assets/box_green.png"
        antialiasing: true
        onClicked: {
            // increase the rotation on click
            rotation += 15
        }
    }

    ClickableImage {
        id: triangle
        x: 248; y: 68
        source: "assets/triangle_red.png"
        antialiasing: true
        onClicked: {
            // several transformations
            rotation += 15
            scale += 0.05
        }
    }

    function _test_transformed() {
        circle.x += 20
        box.rotation = 15
        triangle.scale = 1.2
        triangle.rotation = -15
    }

    function _test_overlap() {
        circle.x += 40
        box.rotation = 15
        triangle.scale = 2.0
        triangle.rotation = 45
    }

}
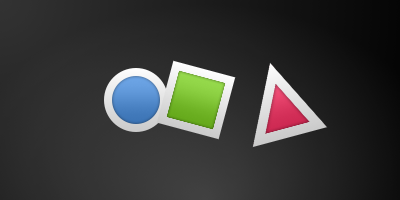
The circle increments the x-position on each click and the box will rotate on each click. The triangle will rotate and scale the image up on each click, to demonstrate a combined transformation. For the scaling and rotation operation we set antialiasing: true to enable anti-aliasing, which is switched off (same as the clipping property clip) for performance reasons. In your own work, when you see some rasterized edges in your graphics, then you should probably switch smoothly on.
Note
To achieve better visual quality when scaling images it is recommended to scale images down instead of up. Scaling an image up with a larger scaling factor will result in scaling artifacts (blurred image). When scaling an image you should consider using `` antialiasing: true`` to enable the usage of a higher quality filter.
The background MouseArea covers the whole background and resets the object values.
Note
Elements which appear earlier in the code have a lower stacking order (called z-order). If you click long enough on circle you will see it moves below box. The z-order can also be manipulated by the z-property of an Item.

This is because box appears later in the code. The same applies also to mouse areas. A mouse area later in the code will overlap (and thus grab the mouse events) of a mouse area earlier in the code.
Please remember: The order of elements in the document matters.
4.5. Positioning Elements
There are a number of QML elements used to position items. These are called positioners and the following are provided in the QtQuick module Row, Column, Grid and Flow. They can be seen showing the same contents in the illustration below.
Note
Before we go into details, let me introduce some helper elements. The red, blue, green, lighter and darker squares. Each of these components contains a 48x48 pixels colorized rectangle. As a reference here is the source code for the RedSquare:
// RedSquare.qml

import QtQuick 2.5

Rectangle {
    width: 48
    height: 48
    color: "#ea7025"
    border.color: Qt.lighter(color)
}
Please note the use of Qt.lighter(color) to produce a lighter border color based on the fill color. We will use these helpers in the next examples to make the source code more compact and hopefully readable. Please remember, each rectangle is initial 48x48 pixels.
The Column element arranges child items into a column by stacking them on top of each other. The spacing property can be used to distance each of the child elements from each other.
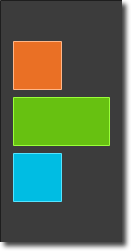
// column.qml

import QtQuick 2.5

DarkSquare {
    id: root
    width: 120
    height: 240

    Column {
        id: row
        anchors.centerIn: parent
        spacing: 8
        RedSquare { }
        GreenSquare { width: 96 }
        BlueSquare { }
    }
}
The Row element places its child items next to each other, either from the left to the right or from the right to the left, depending on the layoutDirection property. Again, spacing is used to separate child items.
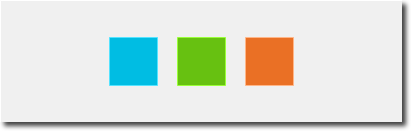
// row.qml

import QtQuick 2.5

BrightSquare {
    id: root
    width: 400; height: 120

    Row {
        id: row
        anchors.centerIn: parent
        spacing: 20
        BlueSquare { }
        GreenSquare { }
        RedSquare { }
    }
}
The Grid element arranges its children in a grid, by setting the rows and columns properties, the number of rows or columns can be constrained. By not setting either of them, the other is calculated from the number of child items. For instance, setting rows to 3 and adding 6 child items will result in 2 columns. The properties flow and layoutDirection are used to control the order in which the items are added to the grid, while spacing controls the amount of space separating the child items.

// grid.qml

import QtQuick 2.5

BrightSquare {
    id: root
    width: 160
    height: 160

    Grid {
        id: grid
        rows: 2
        columns: 2
        anchors.centerIn: parent
        spacing: 8
        RedSquare { }
        RedSquare { }
        RedSquare { }
        RedSquare { }
    }

}
The final positioner is Flow. It adds its child items in a flow. The direction of the flow is controlled using flow and layoutDirection. It can run sideways or from the top to the bottom. It can also run from left to right or in the opposite direction. As the items are added in the flow, they are wrapped to form new rows or columns as needed. In order for a flow to work, it must have a width or a height. This can be set either directly, or though anchor layouts.

// flow.qml

import QtQuick 2.5

BrightSquare {
    id: root
    width: 160
    height: 160

    Flow {
        anchors.fill: parent
        anchors.margins: 20
        spacing: 20
        RedSquare { }
        BlueSquare { }
        GreenSquare { }
    }
}
An element often used with positioners is the Repeater. It works like a for-loop and iterates over a model. In the simplest case a model is just a value providing the number of loops.
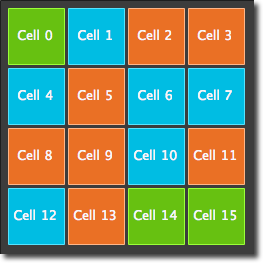
// repeater.qml

import QtQuick 2.5

DarkSquare {
    id: root
    width: 252
    height: 252
    property variant colorArray: ["#00bde3", "#67c111", "#ea7025"]


    Grid{
        anchors.fill: parent
        anchors.margins: 8
        spacing: 4
        Repeater {
            model: 16
            Rectangle {
                width: 56; height: 56
                property int colorIndex: Math.floor(Math.random()*3)
                color: root.colorArray[colorIndex]
                border.color: Qt.lighter(color)
                Text {
                    anchors.centerIn: parent
                    color: "#f0f0f0"
                    text: "Cell " + index
                }
            }
        }
    }
}
In this repeater example, we use some new magic. We define our own color property, which we use as an array of colors. The repeater creates a series of rectangles (16, as defined by the model). For each loop, he creates the rectangle as defined by the child of the repeater. In the rectangle we chose the color by using JS math functions Math.floor(Math.random()*3). This gives us a random number in the range from 0..2, which we use to select the color from our color array. As noted earlier, JavaScript is a core part of Qt Quick, as such the standard libraries are available for us.
A repeater injects the index property into the repeater. It contains the current loop-index. (0,1,..15). We can use this to make our own decisions based on the index, or in our case to visualize the current index with the Text element.
Note
More advanced handling of larger models and kinetic views with dynamic delegates is covered in an own model-view chapter. Repeaters are best used when having a small amount of static data to be presented.
4.6. Layout Items
Todo
do we need to remove all uses of anchors earlier?
QML provides a flexible way to layout items using anchors. The concept of anchoring is part of the Item fundamental properties and available to all visual QML elements. Anchors act like a contract and are stronger than competing geometry changes. Anchors are expressions of relativeness, you always need a related element to anchor with.
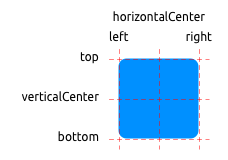
An element has 6 major anchor lines (top, bottom, left, right, horizontalCenter, verticalCenter). Additional there is the baseline anchor for text in Text elements. Each anchor line comes with an offset. In the case of the top, bottom left and right they are called margins. For horizontalCenter, verticalCenter and baseline they are called offsets.
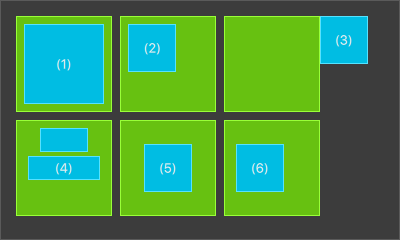
An element fills a parent element
        GreenSquare {
            BlueSquare {
                width: 12
                anchors.fill: parent
                anchors.margins: 8
                text: '(1)'
            }
        }
An element is left aligned to the parent
        GreenSquare {
            BlueSquare {
                width: 48
                y: 8
                anchors.left: parent.left
                anchors.leftMargin: 8
                text: '(2)'
            }
        }
An element left side is aligned to the parent’s right side
        GreenSquare {
            BlueSquare {
                width: 48
                anchors.left: parent.right
                text: '(3)'
            }
        }
Center-aligned elements.
Blue1is horizontally centered on the parent.Blue2is also horizontal centered but onBlue1and it’s top is aligned to theBlue1bottom line.GreenSquare { BlueSquare { id: blue1 width: 48; height: 24 y: 8 anchors.horizontalCenter: parent.horizontalCenter } BlueSquare { id: blue2 width: 72; height: 24 anchors.top: blue1.bottom anchors.topMargin: 4 anchors.horizontalCenter: blue1.horizontalCenter text: '(4)' } }
An element is centered on a parent element
        GreenSquare {
            BlueSquare {
                width: 48
                anchors.centerIn: parent
                text: '(5)'
            }
        }
An element is centered with a left-offset on a parent element using horizontal and vertical center lines
        GreenSquare {
            BlueSquare {
                width: 48
                anchors.horizontalCenter: parent.horizontalCenter
                anchors.horizontalCenterOffset: -12
                anchors.verticalCenter: parent.verticalCenter
                text: '(6)'
            }
        }
Note
Our squares have been enhanced to enable dragging. Try the example and drag around some squares. You will see that (1) can’t be dragged as it’s anchored on all sides, sure you can drag the parent of (1) as it’s not anchored at all. (2) can be vertically dragged as only the left side is anchored. Similar applies to (3). (4) can only be dragged vertically as both squares are horizontally centered. (5) is centered on the parent and as such can’t be dragged, similar applies to (7). Dragging an element means changing their x,y position. As anchoring is stronger than geometry changes such as x,y, dragging is restricted by the anchored lines. We will see this effect later when we discuss animations.
4.7. Input Elements
We have already used the MouseArea as a mouse input element. Next, we’ll focus on keyboard input. We start off with the text editing elements: TextInput and TextEdit.
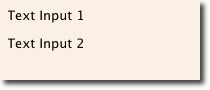
4.7.1. TextInput
The TextInput allows the user to enter a line of text. The element supports input constraints such as validator, inputMask, and echoMode.
// textinput.qml

import QtQuick 2.5

Rectangle {
    width: 200
    height: 80
    color: "linen"

    TextInput {
        id: input1
        x: 8; y: 8
        width: 96; height: 20
        focus: true
        text: "Text Input 1"
    }

    TextInput {
        id: input2
        x: 8; y: 36
        width: 96; height: 20
        text: "Text Input 2"
    }
}
The user can click inside a TextInput to change the focus. To support switching the focus by keyboard, we can use the KeyNavigation attached property.
// textinput2.qml

import QtQuick 2.5

Rectangle {
    width: 200
    height: 80
    color: "linen"

    TextInput {
        id: input1
        x: 8; y: 8
        width: 96; height: 20
        focus: true
        text: "Text Input 1"
        KeyNavigation.tab: input2
    }

    TextInput {
        id: input2
        x: 8; y: 36
        width: 96; height: 20
        text: "Text Input 2"
        KeyNavigation.tab: input1
    }
}
The KeyNavigation attached property supports a preset of navigation keys where an element id is bound to switch focus on the given key press.
A text input element comes with no visual presentation beside a blinking cursor and the entered text. For the user to be able to recognize the element as an input element it needs some visual decoration, for example, a simple rectangle. When placing the TextInput inside an element you need make sure you export the major properties you want others to be able to access.
We move this piece of code into our own component called TLineEditV1 for reuse.
// TLineEditV1.qml

import QtQuick 2.5

Rectangle {
    width: 96; height: input.height + 8
    color: "lightsteelblue"
    border.color: "gray"

    property alias text: input.text
    property alias input: input

    TextInput {
        id: input
        anchors.fill: parent
        anchors.margins: 4
        focus: true
    }
}
Note
If you want to export the TextInput completely, you can export the element by using property alias input: input. The first input is the property name, where the 2nd input is the element id.
We rewrite our KeyNavigation example with the new TLineEditV1 component.
Rectangle {
    ...
    TLineEditV1 {
        id: input1
        ...
    }
    TLineEditV1 {
        id: input2
        ...
    }
}

And try the tab key for navigation. You will experience the focus does not change to input2. The simple use of focus: true is not sufficient. The problem arises, that the focus was transferred to the input2 element the top-level item inside the TlineEditV1 (our Rectangle) received focus and did not forward the focus to the TextInput. To prevent this QML offers the FocusScope.
4.7.2. FocusScope
A focus scope declares that the last child element with focus: true receives the focus if the focus scope receives the focus. So it’s forward the focus to the last focus requesting child element. We will create a 2nd version of our TLineEdit component called TLineEditV2 using the focus scope as the root element.
// TLineEditV2.qml

import QtQuick 2.5

FocusScope {
    width: 96; height: input.height + 8
    Rectangle {
        anchors.fill: parent
        color: "lightsteelblue"
        border.color: "gray"

    }

    property alias text: input.text
    property alias input: input

    TextInput {
        id: input
        anchors.fill: parent
        anchors.margins: 4
        focus: true
    }
}
Our example will now look like this:
Rectangle {
    ...
    TLineEditV2 {
        id: input1
        ...
    }
    TLineEditV2 {
        id: input2
        ...
    }
}
Pressing the tab key now successfully switches the focus between the 2 components and the correct child element inside the component is focused.
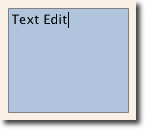
4.7.3. TextEdit
The TextEdit is very similar to TextInput and support a multi-line text edit field. It doesn’t have the text constraint properties as this depends on querying the painted size of the text (paintedHeight, paintedWidth). We also create our own component called TTextEdit to provide an editing background and use the focus scope for better focus forwarding.
// TTextEdit.qml

import QtQuick 2.5

FocusScope {
    width: 96; height: 96
    Rectangle {
        anchors.fill: parent
        color: "lightsteelblue"
        border.color: "gray"

    }

    property alias text: input.text
    property alias input: input

    TextEdit {
        id: input
        anchors.fill: parent
        anchors.margins: 4
        focus: true
    }
}
You can use it like the TLineEdit component
// textedit.qml

import QtQuick 2.5

Rectangle {
    width: 136
    height: 120
    color: "linen"

    TTextEdit {
        id: input
        x: 8; y: 8
        width: 120; height: 104
        focus: true
        text: "Text Edit"
    }
}
4.7.4. Keys Element
The attached property Keys allows executing code based on certain key presses. For example, to move a square around and scale we can hook into the up, down, left and right keys to translate the element and the plus, minus key to scale the element.
// keys.qml

import QtQuick 2.5

DarkSquare {
    width: 400; height: 200

    GreenSquare {
        id: square
        x: 8; y: 8
    }
    focus: true
    Keys.onLeftPressed: square.x -= 8
    Keys.onRightPressed: square.x += 8
    Keys.onUpPressed: square.y -= 8
    Keys.onDownPressed: square.y += 8
    Keys.onPressed: {
        switch(event.key) {
            case Qt.Key_Plus:
                square.scale += 0.2
                break;
            case Qt.Key_Minus:
                square.scale -= 0.2
                break;
        }

    }
}
4.8. Advanced Techniques
4.8.1. Performance of QML
QML and Javascript are interpreted languages. This means that they do not have to be processed by a compiler before being executed. Instead, they are being run inside an execution engine. However, as interpretation is a costly operation various techniques are used to improvide performance.
The QML engine uses just-in-time (JIT) compilation to improve performance. It also caches the intermediate output to avoid having to recompile. This works seamlessly for you as a developer. The only trace of this is that files ending with qmlc and jsc can be found next to the source files.
If you want to avoid the initial start-up penalty induced by the initial parsing you can also pre-compile your QML and Javascript. This requires you to put your code into a Qt resource file and is described in detail in the Compiling QML Ahead of Time chapter in the Qt documentation.